Transform your morning meal into an extraordinary culinary canvas with homemade rainbow waffles! Far from being just a breakfast item, these vibrant, fluffy creations are a delightful experience, perfect for brightening any day, celebrating special occasions, or simply adding a splash of joy to your table. Imagine the smiles when a stack of beautifully colored waffles, crisp on the outside and tender within, graces your plate. This comprehensive, step-by-step guide will walk you through everything you need to know to craft these picture-perfect, delectable treats right in your own kitchen.
Why Choose Homemade Rainbow Waffles?
While the idea of colorful food might seem daunting, making rainbow waffles from scratch is surprisingly straightforward and incredibly rewarding. Beyond their undeniable visual appeal, there are several compelling reasons to embrace this joyful recipe:
- Unforgettable Presentation: Whether it's a birthday brunch, a holiday breakfast, or a casual weekend get-together, rainbow waffles instantly elevate the occasion, making it memorable for guests of all ages. They're a true showstopper!
- Customization at Its Best: Starting with a homemade batter gives you complete control over flavor and texture. You can adjust sweetness, add vanilla extract or other flavorings, and even experiment with different color schemes for specific events, like pastels for Easter or bold hues for Pride Month.
- Kid-Friendly Fun: Involving children in the process, from dividing the batter to selecting colors and even carefully piping, can be a fantastic sensory and bonding experience. They’ll be much more excited to eat something they helped create.
- Superior Taste and Texture: Unlike some pre-made options, a homemade waffle batter yields a truly superior product – soft and fluffy on the inside with that coveted golden crispness on the outside. Add the vibrant colors, and you have a multi-sensory delight.
- A Creative Outlet: For many, cooking is a form of art. Rainbow waffles allow you to express creativity through color and presentation, turning a simple breakfast into an edible masterpiece.
Gathering Your Rainbow Waffle Essentials
Before you dive into the mixing and coloring, let's ensure you have all the necessary ingredients and equipment on hand. Quality matters, especially when aiming for those vivid hues and perfect textures.
Key Ingredients You'll Need:
- Eggs (6, separated): Separating egg yolks and whites is crucial for achieving an incredibly light and airy texture. The beaten egg whites, folded in gently, act as a natural leavening agent, giving your waffles that desirable fluffiness.
- Milk (1 cup): Whole milk is recommended for richness, but any milk variety will work.
- All-Purpose Flour (4 cups): The base of your waffle batter. Ensure it's fresh for best results.
- Baking Powder (8 teaspoons): A significant leavening agent that contributes to the rise and tenderness of the waffles.
- Salt (1 teaspoon): Balances the flavors and enhances the sweetness.
- Melted Butter (10 tablespoons): Adds richness and helps with the crispiness of the cooked waffles. Unsalted butter is preferred so you can control the salt content.
- Gel Food Coloring (red, orange, yellow, green, blue, purple): This is the star of the show! Gel food coloring is absolutely essential for vibrant, concentrated colors without adding excess liquid to your batter, which can dilute the consistency and impact cooking. Liquid food colorings are often too weak for this application. You'll definitely want more red, orange, and yellow to create a balanced rainbow appearance. For more insights on achieving intense hues, check out our guide on Get Vibrant Rainbow Waffles: Easy Recipe & Pro Color Tips.
- Optional additions: A tablespoon of sugar can enhance the slight sweetness and promote browning. A teaspoon of vanilla extract also adds a wonderful aroma and depth of flavor.
Essential Kitchen Tools:
- Large mixing bowls (at least two)
- Six small bowls for dividing the colored batter
- Whisk and rubber spatula
- Electric mixer (for beating egg whites)
- Measuring cups and spoons
- Waffle Iron: The most crucial piece of equipment! Make sure it’s clean and in good working order.
- Ziploc Bags or Piping Bags: These are indispensable for neatly piping each color into the waffle iron, ensuring clean lines and a beautiful rainbow effect.
- Cooking spray or non-stick oil
The Step-by-Step Journey to Perfect Rainbow Waffles
Now that you’re fully equipped, let's get into the fun part: creating your colorful masterpiece!
1. Preparing Your Batter Base
- Separate Eggs: Carefully separate the six eggs. Place the yolks in a large mixing bowl and the whites in a clean, dry bowl (preferably a metal or glass bowl for beating whites).
- Combine Wet Ingredients: Beat the egg yolks lightly, then stir in the milk until well combined. If using vanilla extract, add it here.
- Mix Dry Ingredients: In a separate large bowl, whisk together the all-purpose flour, baking powder, and salt. If adding sugar, include it in this step.
- Combine & Add Butter: Gradually pour the wet egg yolk mixture into the dry ingredients, stirring until just combined. Avoid overmixing! A few lumps are perfectly fine and often lead to a more tender waffle. Stir in the melted butter until incorporated.
- Beat Egg Whites: Using an electric mixer (or a whisk and a lot of arm strength!), beat the egg whites until they form stiff peaks. This means when you lift the whisk, the whites hold their shape firmly.
- Fold in Egg Whites: Gently fold the beaten egg whites into your waffle batter. Use a spatula to incorporate them without deflating the air. This step is key to light and fluffy waffles.
2. Dividing and Coloring Your Batter
This is where the magic truly begins! Aim for bold, distinct colors as they will slightly darken during cooking.
- Divide Batter: Carefully divide the completed waffle batter evenly among six small bowls. Remember the tip from the pros: you'll likely use more of the red, orange, and yellow portions on the waffle iron, so you might consider slightly larger portions for those colors.
- Color Each Bowl: Add a different gel food coloring to each bowl – red, orange, yellow, green, blue, and purple. Start with a small amount and gradually add more, stirring well after each addition, until you achieve very vibrant colors. The intensity now is what will shine through after cooking.
3. The Art of Waffle Iron Piping
Piping requires a bit of speed and precision, but don't worry – even imperfect rainbows are delicious!
- Prepare for Piping: Spoon each colored batter into its own Ziploc bag. Seal the bags and snip off a small corner from one tip of each bag. The opening should be small enough for control but large enough for the batter to squeeze out easily.
- Preheat Waffle Iron: Heat your waffle iron according to the manufacturer's instructions. A well-heated iron is crucial for even cooking and crispiness. Lightly spray with cooking spray if it’s not a non-stick surface.
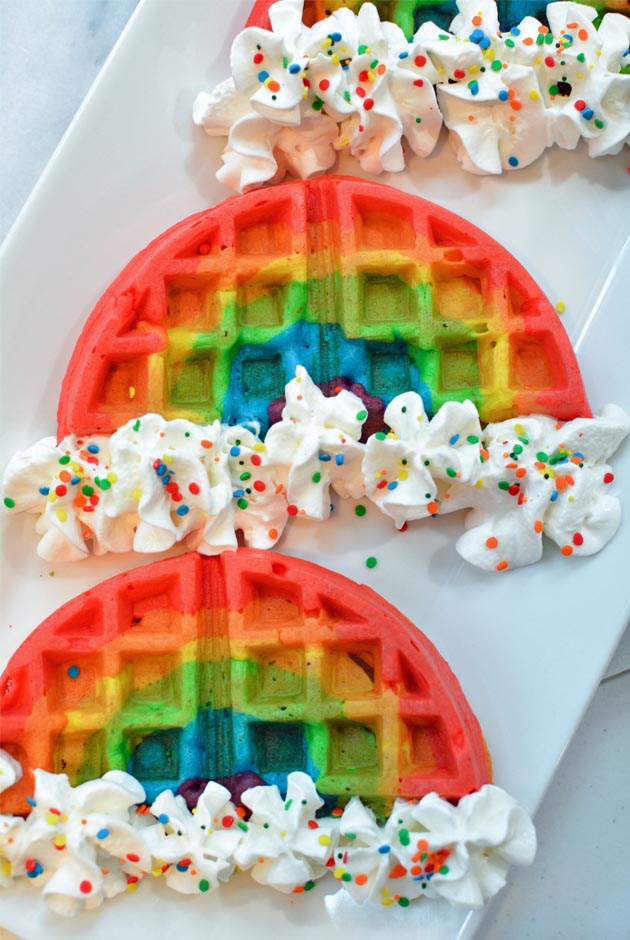
- Pipe the Rainbow: Working quickly, pipe the colored batter onto the hot waffle iron in concentric circles, starting from the outside edge and working your way inward. The traditional rainbow order is red, orange, yellow, green, blue, then purple in the very center. Fill the entire surface of the waffle iron without overfilling.
- Cook and Serve: Close the lid and cook for 3-5 minutes, or until the waffle is golden brown and crisp. Cooking times can vary based on your waffle iron, so consult your manual. Carefully remove the cooked waffle with a fork or spatula.
- Repeat: Continue piping and cooking until all your vibrant batter is used up.
4. Serving Your Masterpiece
Now for the grand finale! These waffles are stunning on their own, but a few garnishes can make them even more special.
- Serve warm with a drizzle of maple syrup, a dollop of whipped cream, or fresh berries. For an extra festive touch, consider topping with different colored whipped creams or rainbow-colored sprinkles.
- For bonus presentation points, when stacking your waffles, rotate the exterior colors to create a truly full rainbow stack that’s appealing from every angle! You can find more creative ways to present these fun treats in our article: Rainbow Waffles: Brighten Any Occasion, Kid-Friendly Fun.
Pro Tips for Rainbow Waffle Success
Even with a clear guide, a few extra insights can make your rainbow waffle journey smoother and even more enjoyable.
Troubleshooting & Customization
- Pale Colors? If your waffles aren't as vibrant as you'd hoped, you likely didn't use enough gel food coloring. Don't be shy with the gel; it takes a good amount to stand up to cooking.
- Waffles Sticking? Ensure your waffle iron is properly preheated and lightly greased before each waffle. If the batter is too thick, it might also stick. Add a tiny splash of milk if needed, but be careful not to make it too thin.
- Too Crispy/Too Soft? Adjust your cooking time. A few extra seconds can make a waffle crispier, while pulling it sooner will keep it softer.
- Time-Saving Hack: For those busy mornings, don't hesitate to use a high-quality boxed waffle mix! Simply prepare the mix according to package directions, then follow the steps for dividing, coloring, and piping.
- Flavor Variations: Beyond vanilla, consider adding a pinch of cinnamon, a touch of almond extract, or even mini chocolate chips to your batter (add before coloring).
- Miniature Magic: Use a mini waffle maker for adorable, bite-sized rainbow waffles, perfect for party platters or smaller appetites.
Storage and Reheating
If you happen to have any leftover rainbow waffles (a rare occurrence!), they store beautifully:
- Refrigeration: Place cooled waffles in an airtight container in the fridge for up to 3 days.
- Freezing: Cooked waffles can be frozen for up to a month. Flash-freeze them on a baking sheet until solid, then transfer to a freezer-safe bag or container.
- Reheating: To restore their crispiness, pop them into a toaster, toaster oven, or conventional oven preheated to 350°F (175°C) for 5-7 minutes. Microwaving will heat them but won't bring back the crisp texture.
Crafting perfect rainbow waffles is more than just following a recipe; it's about embracing creativity, enjoying the process, and sharing a moment of colorful delight with loved ones. With this detailed guide, you're now equipped with all the knowledge and tips needed to turn a simple breakfast into an extraordinary, edible spectrum of joy. So gather your ingredients, fire up your waffle iron, and prepare to bring a burst of color and happiness to your next meal. Happy waffle-making!
